Treat Yourself (For Less!)

It’s okay to indulge everyone else in awhile, especially on Wednesdays when you’re feeling like the week may never end. Plus I’m going to justify this one with the fact that it can be made with under 5 main ingredients. Give and take, folks.

This recipe is from Giada de Laurentiis of the Food Network, and it. is. delicious. Cheesy with a hint of tomato, it’s comforting in the best way. It’s super easy too, so although you may have to go grab a few ingredients, the short cook time makes up for it.

You’ll need:

  • 1 lb Fusilli pasta (For some reason I can’t quite put my finger on, this type works best, but feel free to use penne if you’re not a fan)
  • 1 bag fresh spinach leaves
  • 8 ounces cherry tomatoes (the small circular ones)
  • 1 cup grated asiago cheese (when I made this in China and couldn’t find asiago at the grocery store I opted for the Parmesan-Romano mix instead which worked fine)
  • 1/2 cup grated parmesan cheese
  • 1/4 cup olive oil
  • 1 garlic clove, minced (or about a teaspoon of garlic power if that’s easier)
  • Salt and pepper (about half a teaspoon of each)

Directions:

  1. Cook the pasta, which should take about 8-10 minutes, in which time you can start chopping:
  2. Roughly chop the fresh spinach and slice the cherry tomatoes in halves
  3. While the pasta is still cooking, heat a large pan (all the pasta and everything has to fit in it) with drizzled olive oil over medium heat
  4. Add the minced/chopped garlic and cook for about two minutes
  5. Add the spinach and tomatoes, and cook for another two minutes, or until the spinach wilts
  6. Add the cooked pasta to the pan and toss with the existing ingredients
  7. Add the cheeses and salt and pepper and stir it all together so it combines into a gooey sauce
  8. Serve while it’s still warm

Here’s a visual guide:

Begin cooking the pasta and while the water boils, chop the tomatoes

Heat a large pan/skillet over medium heat and while it's warming, chop the spinach

Add minced and chopped garlic to the pan and cook for two minutes

Add the tomatoes and spinach and cook for two more minutes

Add the cooked pasta to the pan and toss with the other ingredients

Add the cheeses and salt and pepper and stir everything together thoroughly. Serve while warm.

The cheese definitely makes the dish heavier (but also tastier!), so if you want to cut back on the calories, skip the cheese and toss the pasta in olive oil. Don’t skip the garlic or tomatoes and spinach- they make the dish!

Here’s the Food Network’s pasta collection

Check out a couple of my pasta recipes

Try some quick and healthy pasta recipes from Eatingwell.com

Leave a comment »

UCONNLIFE features the blog!

Hey guys, check out the new website, UCONNLIFE, to see an article featuring Conquer the College Kitchen!

Also check out an article at the same website featuring a friend’s blog here.

Leave a comment »

Meet My Favorite Quick Fix

Wraps are healthy. Wraps are cheap. Wraps are versatile.

So how it is that a post on wraps has yet to be done? In particular, a post about wheat wraps lined with basil pesto and topped with sliced turkey and roma tomatoes?

This is one of the easiest meals, made in record time (4:30 thank you very much), and there’s few ingredients involved. Chances are you already have them in your fridge. If not, grab em’ next time your’re at the store, since this is one of those no-planning processes.  It’ll work for lunch or dinner.

You’ll need:

  • Tortilla Wraps. Wheat is healthier than regular plain ones, but feel free to go either route, or mix it up with a different flavor like tomato basil or honey wheat. Medium or small sizes work best.
  • Basil pesto. I usually keep a small container in the fridge and use it on multiple occasions (with pasta or sandwiches). You’ll need about two spoonfuls for this recipe. Feeling daring? Make your own pesto using my recipe.
  • Fresh sliced turkey breast from you local deli. Smoked or honey works best for this particular wrap. You’ll need about five or six slices, unless you want your wrap on the thick side, in which case throw in a few more slices.
  • One roma tomato (the oval-shaped ones), since they’re a touch healthier. A regular ones (only use half) will do just fine as well.
  • Black pepper to taste.

Directions:

  1. Cover about three-quarters of the wrap, laid out flat, with the pesto (about two spoonfuls), spreading it evenly. Be generous here, that pesto flavor completes the wrap.
  2. Dice up the tomato into small cubes. Then layer the tomatoes on top of the pesto.
  3. Pile the turkey on top, making sure you cover most of the surface
  4. Sprinkle some back pepper over it all then get ready for the tricky part, wrapping it up. If you’re like me, and not too concerned with the wrap staying together since you;re about to devour it anyway, then you can just fold it up as you would a fajita or soft taco, making sure one end overlaps the other.
  5. If you’re on the fancier side and maybe serving this to guests or want to save it for later, you should fold two opposing sides inward, then wrap it up, making sure all the stuffing stays in the middle. If you have some handy, stick a toothpick on two sides of the wrap and cut it in half.

Here’s a visual step-by-step:

Spread the pesto evenly

Dice the tomato into small cubes

Toss the tomatoes over the pesto

Layer the turkey on top and sprinkle with black pepper

Wrap it all up, connecting two opposing sides

The ultimate pesto-lover in me prefers this wrap, but there are a ton of different options you could try. Grilled chicken would work great here, or instead of pesto, use spicy brown mustard, your favorite salad dressing or hummus. Almost anything will substitute, so get creative! Throw in some lettuce for an extra crunch, or add some mozzarella cheese for a delicious (yet a bit unhealthier) touch.

Featured Links

Check out the Food Network’s Food Network’s wrap collection for more great ideas.

cdkitchen.com‘s large variety of wrap recipes

Healthy Sandwich and wrap ideas from Fitness Magazine

Comments (2) »

Welcome Back!

Back to school. With new classes comes homework, but with Friday night comes cheap drink specials at the bar. It also means back to cooking for yourself. As you’re moving back into your apartment or house, you’re probably thinking about toilet paper, new furniture, and the ridiculously large sum you just paid for rent; but sooner or later you’re going to have to buy some groceries.  Just like last semester, I’m going to give you a bunch of new recipes to try, and some tips about staying healthy at school.

Before you chef it up, you’ll want to stock your pantry with a few staples, so you can enjoy all those recipes instead of scrambling for substitutes or ordering a pizza brimming with grease and empty calories.  They’re all items that should last awhile, and you’ll use all the time.  You can find everything at a big grocery store for pretty cheap, and feel free to get any brand or type of each item.

  • Extra virgin olive oil (if you buy one thing, make it this!)
  • Balsamic Vinegar
  • Herbs (dried): basil, oregano, cilantro, parsley, rosemary
  • Spices: black pepper, crushed red pepper, garlic powder, cinnamon
  • Flour
  • Sugar
  • Salad dressing and/or marinade (balsamic vinaigrette, Italian, Ranch, etc.) Sometimes you can find great dressings or marinades in unexpected places for really good prices. I recently found a great Asian marinade at Marshall’s for $3.99! Check out Trader Joe’s or Stonewall Kitchen for more delicious options.
  • Frozen skinless chicken breast
  • Butter or margarine
  • Milk
  • Pasta
  • Bread/wraps
  • Tortilla chips/wheat thins/pretzels/crackers

Those are the staples that I use all the time in my cooking, that I have found many recipes call for. I’ll always give you healthy options, but to help yourself out even more, buy smart options from the beginining, like whole grain pasta and bread, or low-fat milk and margarine.

While most of those things won’t go bad, and you’ll use on multiple occasions, here’s some items you should pick up on your regular grocery store runs, whether you choose to incorporate them in some of my recipes or for your own snacking purposes.  Keep in mind you can find many of these things in low-fat options as well.

  • Fresh fruit: apples, bananas, berries (fresh and frozen), tomatoes, lemons/limes, oranges, peaches
  • Fresh vegetables: red and green peppers, onions, lettuce, corn, cucumbers
  • Cheese: mozzarella, shredded parmesan and shredded cheddar (or monterey jack, etc.), blocked cheese
  • Sliced deli meat and cheese
  • potatoes
  • Hummus
  • Salsa
  • Canned diced tomatoes
  • Yogurt
  • Granola
  • Peanut butter
  • Wheat thins or crackers
  • Brown rice
  • Croutons
  • Mustard/mayo
  • Honey
  • Juice (orange, cranberry, etc.)

That’s all I’ve got for now. Don’t hesitate to leave a comment below if you think of something I didn’t to add to this list! If you’re headed back to campus, good luck with move in and enjoy your first week(end) back. Keep on the look out for great new recipes and ideas for quick fix snacks coming your way 🙂

Leave a comment »

Finals Edition #2: Spinach

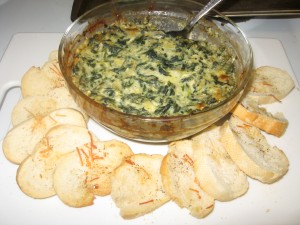
Spinach is one of the foods on our “brain list” this week.  It’s packed with vitamins and long-term memory aids.  Unfortunately for many people, this green tends to need a lot of help when it comes to the taste department.  It’s really great in salad, and for a light spring dish, mix it with strawberries and the dressing I used over the fruit salad from yesterday’s post.  It also works easily in sandwiches or omelets.  But if you’re looking for something a little more comforting than just a salad (go ahead, reward yourself for that all-nighter you pulled), try this hot spinach and artichoke dip.  It’s cheesy and delicious, especially with bread or tortilla chips.  For a healthier option, try it with vegetables like red peppers strips.  It’s easier than it looks, but it does take some time, so make it on a night you have a little free time to relax and de-stress.  We used the recipe for Applebee’s version of the dip, which can be found on RecipeZaar.  

You’ll need:

Directions:

  1. Pre-heat the oven to 350 degrees.
  2. Prepare the alfredo sauce and make sure you keep a close eye on it so it doesn’t burn.
  3. Thaw the frozen spinach using the defrost option in the microwave, unless it’s already thawed.
  4. Mince and chop the garlic, shred the cheese and soften the cream cheese.
  5. Chop the artichokes.  A good easy way to do this is rinse and drain them then put them back in the can and using a knife, mash them up in the can.
  6. Combine all the ingredients into a medium sized bowl and stir everything together, or if you have a food processor use it: it really helps in breaking up the artichokes
  7. Once the ingredients are thoroughly combined, transfer the mixture to a baking pan.  I used an oven-safe bowl which worked just as well, it’s up to you how you want to serve the dip.
  8. Sprinkle some of the remaining parmesan over the top of the mixture.
  9. Cook at 350 for 25-30 minutes, or until the cheese is crispy brown and melted.
  10. As soon as you put the dip into the oven, slice up the baguette (if that’s what you’re having it with), lightly drizzle each slice with olive oil and sprinkle black pepper and a little shredded parmesan over each. Put the bread into the same oven for about 12-15 minutes.  It’s best if you time it so they’ll come out at the same time.
  11. Let both cool before serving.

Here’s the visual guide:


Prepare the alfredo sauce


Thaw the frozen spinach


Rinse, drain and chop the artichokes


Combine all the ingredients and mix together


Transfer the mixture into an oven-safe bowl or a dish


Slice the bread and prepare with olive oil, black pepper and cheese


Put both into the 350 degree oven


Leave the bread in for 12-15 minutes, and the dip for 25-30 minutes


Other great spinach and artichoke dips to try:

Paula Deen’s recipe at the Food Network: a little on the Spicy side

A recipe with red pepper in it at About.Com

A bunch of different spinach and artichoke dip options from Kraft Foods

Finals week snack suggestion:

Trail mix! Nuts a great source of B-vitamins, which fight against stress.  They’re pretty high in fat though (don’t worry healthy fat), so stick to smaller portions, about 1/4 cup or so.  Almonds, pistachios and walnuts are all good for your immune system.  Mix in some Honey Nut Cheerios (or another cereal) to mix it up and add a little sweetness.  This is a great snack you can make a lot of and then throw in a bag to bring with you on the go.

Leave a comment »

A staple turned healthy: grilled cheese

Apparently April is National Grilled Cheese Month… who knew?  Grilled cheese is undoubtedly a college staple being its quick and easy self.  But, unfortunately it’s not the healthiest of meals, and most people don’t bother thinking about how fattening the toasted gooey goodness really is.  One way to lighten up a grilled cheese is to use low-fat cheese (swiss or provolone are good options) rather than pre-sliced and packaged singles.  An even better way to make a healthy version is to stuff the sandwich with ingredients that are good for you and will keep you full for longer.  Instead of layering cheese slice after slice, opt for vegetables, or something with substance like chicken or deli meat (you’ll get your protein for the day too!).  Instead of using the traditional butter in your pan, try using a non-stick spray or even a little bit of olive oil to cook the sandwich.  

Here are some great options to try from the Food Network’s blog post on grilled cheese.:

  • Turkey, Swiss and sundried tomatoes on whole-wheat bread
  • Low-fat cheddar, honey mustard and granny smith apple slices on multi-grain bread
  • Goat cheese, tomato and baby spinach in a whole-wheat pita
  • Part-skim mozzarella, basil and roasted red pepper on whole-wheat bread
  • Manchego, arugula and olive tapenade on an English muffin
  • Jarlsberg Lite, grilled chicken breast and BBQ sauce on potato bread
  • Low-fat cheddar, salsa and spinach on multi-grain bread

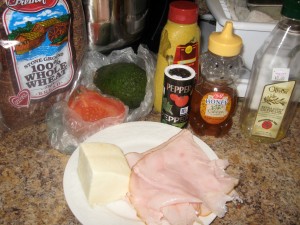
I made a grilled cheese for lunch yesterday that was loaded with sliced turkey breast and mozzarella cheese, topped with tomato slices and avocado slices.  To flavor it up I spread brown mustard and a dab of honey and sprinkled black pepper.  It was a delicious combo and kept me full all day- a much healthier alternative to the traditional bread and cheese combo.

You’ll need:

  • Two slices of whole wheat bread
  • Three slices of turkey breast (or sandwich meat of choice)
  • A few thin slices of mozzarella cheese
  • A couple thin tomato slices
  • A couple thin slices of avocado (or another vegetable of choice)
  • Brown spicy mustard
  • Honey (about half a teaspoon)
  • Black pepper
  • Non-stick cooking spray or olive oil (the spray works best, all I had was olive oil)

Directions:


  1. Spray the pan or coat lightly with olive oil and bring to low-medium heat.
  2. Slice the tomato and avocado and get everything else out and ready.
  3. Place the turkey and cheese on one slice of bread and top with the honey, mustard and pepper, and then place this slice (bread down) and the other slice on the pan.  You’ll have to stay by the pan and watch it: they’ll heat up fast.
  4. Let this cook for a minute then add the tomato and avocado to the slice with the turkey and cheese, and place the other slice of bread on top of this slice, completing the sandwich.  
  5. Flip the sandwich once to make sure both sides and browned, and take it off the heat when it’s golden brown, or if you like it a little bit on the crisper side (like my picture), wait a second longer… read: I screwed up.  Don’t wait too long, it really tastes 10 times better golden brown and not burned.
  6. Let it cool, cut it in half, and enjoy!


Here’s the visual guide (I missed a couple of steps of pictures since this process moves quick, but you get the gist):


Put the bread, one with turkey and cheese, on low-medium heat

Top with honey, mustard and pepper

Add the veggies, top with the other slice, and flip

Here are some other grilled cheese recipes to try:

Looking for a breakfast version?  Check out this one at All Recipes

The Top 10 grilled cheese recipes from Delish

A spin on grilled cheese: Bobby Flay’s grilled cheese bruschetta at the Food Network

Leave a comment »

Finals edition #1: fruit


It’s that time of year again, and as finals dreadfully dawn in Storrs, I’m bringing you a week’s worth of “brain food” to get you awake and motivated.  Most of rely on endless cups of coffee to get us through the week (I’m probably the guiltiest of all).  And when it comes to food for the week- that is, if we remember to eat, it’s usually grabbing a snack on the go between an exam and the library.  There are a few healthy options at the library (go for the yogurt parfait, or a protein bar over the candy or chips), but if you have the chance to eat at your place or at least make something to bring with you to the library, DO SO!  According to a post from Healthy Eats on the Food Network site, eating better can improve your academic performance immensely:

“High-fat packaged snacks, fried foods and other calorie-laden choices (late-night pizza run, anyone?) are tempting, but these foods will only fill you up (too much) and slow you down. You’ll feel sleepy, especially if you indulge towards the end of the day. In fact, a new study suggests that fatty foods can bog down your short-term memory — no good if you’re in the middle of exams or a big project.”

With that in mind, check back throughout the weak to read my latest post of finals edition.  In addition to an easy recipe, I’ll throw in a snack suggestion you can buy at the store if you don’t have any time to cook.  Best of luck to everyone on exams!

Brain food #1: Fruit (in particular, berries)

The antioxidants in berries has been proven to improve short-term memory (hello flash cards), plus they’re really healthy for your diet.  They’re very versatile and you can throw them in anything from cereal to smoothies, or enjoy them on their own.  Fruit also lends itself beautifully to yogurt (see my parfait recipe).  Warning: they are on the expensive side of the scale when it comes to grocery shopping; however, a little goes a long way when you use them the right way.  One way to do so is to mix them in a quick and easy fruit salad.

You’ll need:

  • Whatever fruit you want to use really, but consider the facts about berries and maybe this week opt for the blueberries, strawberries and raspberries: a winning combo.  I also threw in one of my favorite fruit, pineapple, but grapes,blackberries or peaches are other good choices.  Unless you’re serving for a lot of people, only buy a pack of each kind, since they’re pretty pricey especially since it’s not quite season yet for most of these berries yet.  
  • The juice of one lemon, to kick up the flavor

Now, you can leave it as is and enjoy the fruit the natural way (the healthier option), but I hear a lot of people complain about fruit (it’s too boring on its own, not tasty enough), so if you’d like make my poppyseed dressing, or throw these items together to drizzle over the salad:

  • A dash of sugar (don’t overdo it, the fruit already has natural sugar)
  • A dash of poppy seeds (not vital- I just had them in my cabinet)
  • About 1/2 teaspoon of white vinegar
  • About 1 teaspoon of honey
  • 1/2 teaspoon olive oil
  • A dash of cinnamon powder
  • A dash of salt

Directions:

  1. Rinse and drain all the fruit and put it all in a bowl.
  2. Stir it all together then top with lemon juice, squeezing the lemon right over the salad, facing the lemon up so you don’t drop any of the seeds in.  Stir again.
  3. Leave it here if you want to enjoy the fruit on its own.  Otherwise mix all the dressing ingredients together in a small bowl and stir thoroughly, making sure the thickness of the honey dissolves into the oil and vinegar.
  4. Drizzle the dressing over the bowl and stir the fruit together again, making sure you get every corner.  If you want to, drain the salad again for just a second to get the excess dressing out before putting back in the bowl.
  5. Store the salad in the fridge since it tastes better cold, and enjoy it by itself, or with yogurt in a parfait.

Here’s a step-by-step:

rinse and drain all the fruit


Stir all the fruit together and squeeze a fresh lemon over the salad


Prepare the dressing, stirring thoroughly


Drizzle the dressing over the salad and stir again


The Food Network has an entire collection of fruit salad recipes.  Here’s some of the best:

Paula Deen’s fruit salad (Paula Deen makes a healthy dish??) with honey dressing: the orange juice adds a nice touch

Grilled fruit salad from Sunny Anderson: a unique twist

A fruit salad made on Barefoot Contessa featuring all those healthy berries

Snack suggestion:

Pretzels with hummus.  Healthy carbs are our brain’s primary energy source.  Go for the whole-wheat pretzels since they’re also a good source of fiber.  Flavor it up with a low-fat hummus of your choice.  My advice is to dish yourself a big spoonful of hummus and a handful of pretzels, then put the stuff away, this snack can be very addicting!  Got the time? Try my hummus recipe.

Leave a comment »

More pizza (as if that’s a bad thing)

As part of my final project for online journalism, I’m creating a website and focusing my attention on pizza.  Pizza is one of the best things I can suggest to college cooks, since it’s cheap and actually really easy to make, which is why I talk about it so much.  Alas, we’re forgetting the best part: the taste.  That’s right, nobody can deny how delicious homemade pizza is.  Now don’t get me wrong, the classic options (cheese, pepperoni) are always great; but I much prefer trying unique recipes when it comes to pizza, and a new one I recently tried making for my friends is a barbecue chicken pie with onions and cilantro.  Don’t be scared to try new things when it comes to making pizza, it’s one of the best mediums to get creative with.  


Here’s what you’ll need:

  • Pizza dough (1 1/2 lb ball)
  • One boneless, skinless chicken breast
  • Barbecue sauce: I used Olde Cape Cod, Stonewall Kitchen has a great honey barbecue sauce too. You’ll need about 1/4 cup for the chicken and another few tablespoons for the pizza
  • Shredded mozzarella cheese (about 3/4 bag)
  • Cilantro: fresh would be ideal, but I didn’t have any at the time, so I used dried and it worked just as well
  • 1/4 red onion OR scallions (I love scallions on this pizza, but I had an onion in my kitchen, and didn’t have any scallions: but I definitely recommend scallions)
  • Crushed red pepper (about 1 teaspoon)
  • Garlic powder (about 1/2 teaspoon)
  • Black pepper(about 1/2 teaspoon)
  • Dried oregano (about 1 teaspoon)
  • Dried basil (about 1/2 teaspoon)

Directions:

  1. Make sure you cover the dough in flour, and leave enough time to let the bread rise in a bowl covered loosely in Saran wrap at room temperature (at least 4 hours or so).
  2. Heat a small pan to medium-high, and drizzle olive oil and pre-heat your oven to 400 degrees.
  3. To prepare the chicken, rinse and dry it, then smother it in barbecue sauce and rub basil, black pepper and crushed red pepper all over both sides, then place it in the heated pan and let it cook thoroughly, reapplying the ingredients periodically while it cooks.
  4. While the chicken is cooking, you can begin preparing the bread dough.  Roll the ball out over a floured surface with a rolling pin, or using your hands and a spoon, making sure you rid of any air bubbles.  Before you add anything to the pizza, put the dough onto the pan you’re going to cook it on: it will make the process much easier.
  5. When it’s flat and rectangular, spread a few tablespoons of barbecue sauce over the dough.  I went light with the sauce, but if I could do it again I would add much more since it was a little dry.  Think of the barbecue sauce almost as a replacement for red sauce on a traditional pizza: but don’t use quite as much.
  6. Make sure you check the chicken before you move on and take it off the heat if it’s ready.  Then chop it into tiny pieces to top the pizza.  You can also chop the red onion (or scallions) at this point, into very tiny pieces.
  7. Sprinkle the cheese over the entire pizza, covering every corner and even reaching to some of the crust.
  8. Add the chopped chicken, spreading it evenly over the pizza, and next the cilantro and either scallions or chopped onions.
  9. Sprinkle evenly black pepper, oregano, garlic powder, and a little crushed red pepper if you like it on the spicier side.
  10. Put the pizza into the oven at 400 degrees for about 17-20 minutes (make sure you watch it, all ovens vary) but this should be pretty accurate.
  11. Let it cool then slice: I find with rectangular pizzas slicing into squares works best.

Some of my friends like dipping this pizza into a side of barbecue sauce or Balsamic dressing, but it’s also great on its own.  Enjoy!

Here’s some of the pictures I took.  I apologize for not having a complete guide: I was making a few different pizzas at a time, so I didn’t manage to document every part.  That’s also why you’ll notice a few different kinds in the pictures, and if any look good, try them on your own, or leave a comment and I’ll be sure to post the recipe 🙂

Let the floured dough rise


Cook the chicken in barbecue sauce


Add all the ingredients and let it cook (Again sorry for the lack of pictures!)


The finished product


Try these the unique pizza recipes:

Everything from Thai pizza to chocolate pizza at the Food Network

Recipes using every topping you could imagine at Pizza Recipe

Tons of different pizzas at All Recipes

Leave a comment »

The Spring Weekend Sunday smoothie

As Uconn’s favorite holiday once again comes and goes, Sunday morning brings the not-so-welcome repercussions of the three day festival.  In spirit of Spring Weekend, I decided to try an item or two myself from the Food Network’s suggested hangover cures.  I enjoyed a plate of scrambled eggs with a strawberry banana smoothie, since according to the article, “Drink a smoothie (with lots of fruit) to up your blood sugar and replenish at least one or two nutrients you might have lost the previous night.”  

Now I know most people know how to make a smoothie, but this post is more about the suggestion than the execution.  Smoothies are really easy as long as you have a blender and a couple of ingredients.  You can enjoy many different types, and they’re really healthy for you.  Feel free to mix it up and pick out your favorite items to combine for a delicious, refreshing flavor.

For one serving, you’ll need:

  • Ice cubes (about 15)
  • One yogurt.  I used Yoplait whips in strawberry, but other great options are french vanilla or any other fruity flavors
  • Fruit of choice.  I used a banana, because the potassium works against the dehydrating effects of alcohol and it goes well with strawberry.

Directions (as if they’re really pertinent):

  1. Throw it all in the blender and let it do its thing.

The smoothie didn’t completely cure my headache, so don’t omit the Advil or sleep.  But it’s a nice pick me up, and it definitely a great alternative to other foods that might not go down so easy.  Enjoy!

Mix all the ingredients together and blend


There are a ton of websites with smoothie information and recipes.  Here are some top choices:

Smoothie Web: with tons of different categories and unique recipes

Flowercarole.com, which has vegetable smoothies, or non-dairy ones too

Healthy and refreshing smoothies from Fitness Magazine


Comments (2) »

Ditch the Tostitos, fresh is best

As promised, I’m bringing you a recipe to use those leftovers from my last post: the black beans and corn.  What I didn’t tell you was that this recipe was one of the best things I’ve made all semester.  It’s a simple salsa, but it’s so delicious and the fresh ingredients knock that jar of Tostitos that’s sitting in your cabinet right out of the water.  Homemade salsa is really healthy, as long as you moderate your portions.  Of course it’s traditionally served with chips, but for a healthy alternative, use it over chicken, or in a salad.  Here are some recipes using salsa from Yahoo.  You’ll probably need to go buy some ingredients, but everything is pretty cheap, and you’ll use everything.  

You’ll need:

  • The leftover corn (3/4 cup)
  • The leftover black beans (2/3 cup)
  • 1 jalapeno
  • 2 medium tomatoes
  • 1 red pepper
  • 1 avocado (optional)
  • 1/4 cup diced red onion
  • 1/3 cup fresh cilantro (don’t omit!)
  • 1/4 cup fresh lime juice (about 2 limes, but I had lime juice at my place so I used that)
  • Salt and pepper to taste

Directions:

  1. Put the leftover corn and beans together in a large bowl.
  2. Chop all the vegetables except the avocado.  The tomatoes, onion, jalapeno and red pepper.  This is the most tedious part of the process, especially the tomatoes.
  3. Add these ingredients to the bowl and mix everything together.
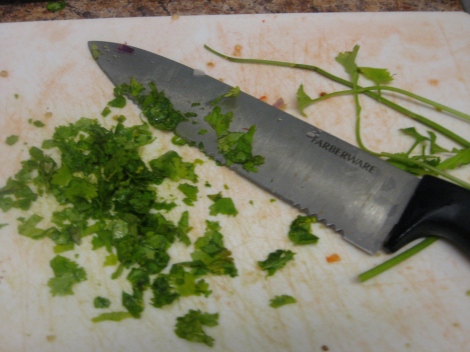
  4. Chop the fresh cilantro and add that to the bowl.
  5. Add the lime juice, salt and pepper and stir everything thoroughly.
  6. Now, you can be done here if you’d like: it’s delicious just like this. Or, store it in the fridge for at least two hours, and then just before serving, chop the avocado and add that to the salsa. I didn’t include the avocado in the pictures, because I haven’t served the salsa to anyone (other than myself) and have yet to add the avocado; but it does add a great touch.

Serving tip: If using tortilla chips, put them in a pan and place them in a 350 degree oven for a few minutes before serving.  The contrast of cold salsa and warm chips is fantastic., which is why most restaurants do this.

A ridiculously easy recipe, yet one of the tastiest!  It’s a perfect solution if you’re having friends over, or want to store something you can use a snack for a few days.  Enjoy!

The picture step-by-step:

Use the leftover corn and black beans


Chop the vegetables: tomatoes will take you the longest


Keep chopping!


Add all the vegetables together and stir


Chop the fresh cilantro and add that to the bowl


Add the lime juice, salt and pepper to the bowl and stir one more time


Enjoy with warm tortilla chips


Try these other great salsa recipes:

Top 20 salsa recipes from AllRecipes.com

The Food Network’s salsa collection

Great-Salsa.com… pretty self-explanatory

Comments (1) »